Monday 10 December 2018

Cosplay hair - Erendis braid

Today's post is more pic spam than tutorial, featuring the hairstyle I wore for my improvised Erendis cosplay during a 2017 Tolkien convention. It consists of a three-strand braid with a paranda (tutorial in the link) with the addition of simple three-strand side-braids tied at the back and adorned with a star hairpin. I also like to wear a flexi-8 when wearing three strand-braids, both because of decoration and practicality - my straight, fine-textured hair is really slippery and even with the paranda the braid will become undone during the day, so the flexi-8 helps keeping the braid more in place. Already posted this updo, with casual Erendis pics, in this post:

 And here are the pics from the convention mini shoot:
 
SwordWomanRiona / rionashairblog.blogspot.com.es


If you copy-and-paste this post and/or alter it without any permission, credit or link, you're stealing my content. In that case, please stop. Please ask before using my work, or at least share it properly, giving credit to me and my blog.

Tuesday 20 November 2018

Cosplay hair: Lúthien variation (September 2018)

Ted Nasmith-inspired 🍃☄️Lúthien Tinúviel cosplay ☄️🍃 variation this past September, featuring fingertip+ length shots and hair pics! 

It seems that my dark auburn hair likes to get *really* red in the afternoon sunlight, and I’m 100% OK with that 👌💙, even though it’s way redder than it should be for Lúthien, but ah well xD


SwordWomanRiona / rionashairblog.blogspot.com.es
If you copy-and-paste this post and/or alter it without any permission, credit or link, you're stealing my content. In that case, please stop. Please ask before using my work, or at least share it properly, giving credit to me and my blog.

Friday 8 June 2018

Random hairstyles: Braided buns and ponytails

Been uploading these in the individual posts for each hairstyle, but let's also have these recent-ish hairstyles in their own post :)
  • Ponytails
Featuring sunset lighting, which makes my auburn hair look really reddish, and I approve 100% :D <3:


Another ponytail shot at archery classes :):
 
 Side view:


SwordWomanRiona / rionashairblog.blogspot.com.es
If you copy-and-paste this post and/or alter it without any permission, credit or link, you're stealing my content. In that case, please stop. Please ask before using my work, or at least share it properly, giving credit to me and my blog.

Saturday 2 June 2018

Length hairstory - 2012 and fingertip

You can find an abridged version of my hair journey from 2010 in the 'My hairstory' page. This is the third in a series of individual posts that's basically about a bit more detail about my hair growing over the years, plus a pic spam of length shots xD

Previous post: 2011 hair (classic length).

2012 was the year I reached fingertip (in between classic and mid-thigh, it's the length where you stretch your arm straight at the side and your hair reaches the tip of your fingers):

I regained a bit more thickness during this year, although I still wanted to thicken up the hemline (that hasn't really changed throughout the years, really, I'm always wanting a thicker hemline :S xDD). But overall this was a pretty good year hairwise - I'm actually back at fingertip now, after the big trim a couple of months ago from knee, and I'm looking at the 2011-12 pics for inspiration xD Hoping to start experimenting more with texture and styles now that I'm more comfortable with how the hemline is looking :)

But let's proceed with the 2012 pic spam xD (also featuring the way auburn hair changes hue with the lighting xD):
  • February:
  •  March: Length shots (plus heatless bun waves) from a test for a show organized by my Irish group for Saint Patrick's Day (I reenacted an Irish Queen of the Sidhe from the story of Oisín and Niamh). One of my favourite hair days, both regarding length shots, and bunwaves (original updo was a seashell bun) ^^
  • April: Finally reached fingertip! (and have a blurry pic to prove it xDD)
  
  • May: Two length shots featuring heatless texture experiments (braidwaves+bandanna curls/rag curls in the ends):

  • June: Just a length pic - 


  • July: July 2012 has some of my favourite length shot hair pics :) Also involving my (Elven) ranger cosplay WIP with that leather jerkin :D xD
One of my favourite hair pics ^^


Next stop - 2013 and mid-thigh!

SwordWomanRiona / rionashairblog.blogspot.com.es
If you copy-and-paste this post and/or alter it without any permission, credit or link, you're stealing my content. In that case, please stop. Please ask before using my work, or at least share it properly, giving credit to me and my blog.

Monday 9 April 2018

Historical styles - 15th Century Burgundian braided updo and conical hennin

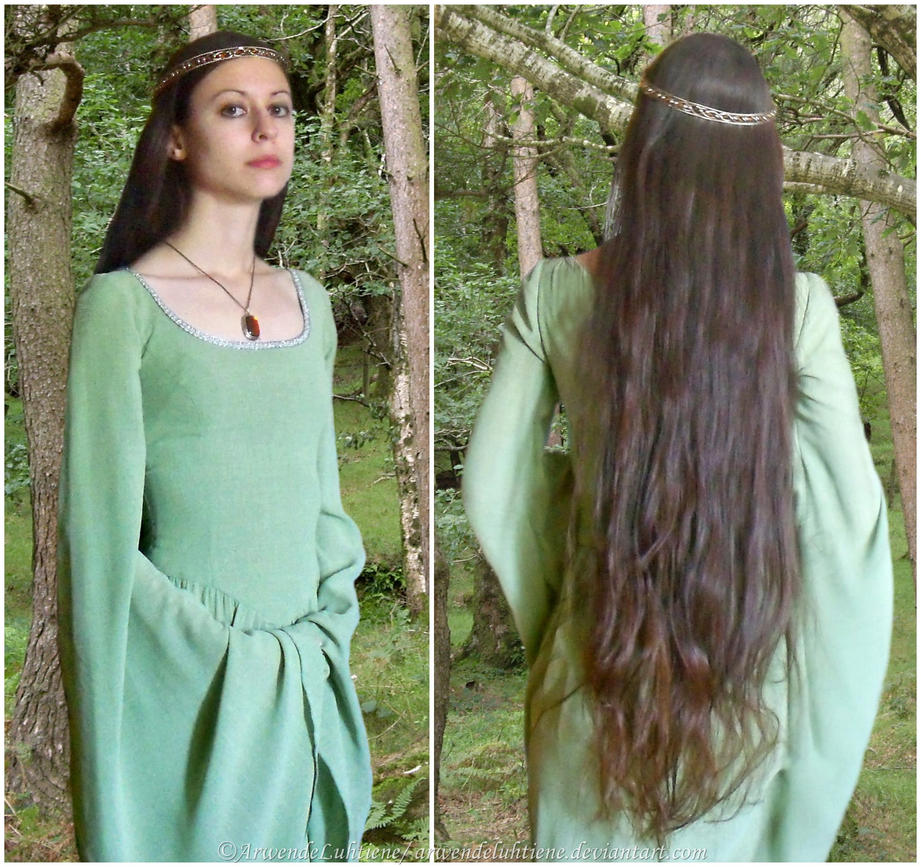
Today's hairstyle post is about historical reenactment and the Middle Ages - The updo I wore for my late 15th Century Burgundian reenactment, under a conical hennin:

I actually debuted this reenactment at a Tolkien convention, so all these pics are a Noldorin Elven version (those are actually Vulcan ears, I didn't have any Elven ears at that point xD). 15th Century Burgundian fashion wasn’t a headcanon of mine for Elven fashion before this, but I can totally see the (in my headcanon at least) quite fashion-extravagant Noldor wearing this kind of court fashion xD And the looped braids kind of showcase the pointy ears, too!


The hairstyle is something that can easily be worn under the hennin, and it’s also inspired in what can be seen of the hair (ugh for the patriarchal modesty mindsets :S) in illuminations from the time - There are examples of looped braids that show under the hennin (1, 2, 3), and examples of the hair being worn in a high bun under the hennin. In my case, it’s a braided high bun with a paranda (no foam donut in my case, although that’s another option). The two front accent braids are braided with golden cord and looped around the ear, crisscrossed and tucked around the bun. For an alternative Elven-inspired style, those front braids could also be worn hanging loose (this is actually how this Burgundian woman wears her hair, too!)
  • For this style I used:
-Comb and/or brush as needed.
-A metal-free elastic for the initial ponytail
-Paranda for the braided ponytail (or a foam donut, or both. Both resulted in an overlarge, too heavy bun in my case).
-Lots and lots of pins (open bun pins and closed bobby pins. Like, LOTS.
-Fixator, like hairspray
-Tangle Teazer to untangle the root backcombing easily and damage-free.  Baby brush to brush off the hairspray and smooth all the hair
Steps:
  •  Hairstyle:
-Separate two front sections and braid to create the accent braids. Add cord or ribbon as a decorative effect if desired.
-Pull the rest of the hair into a high ponytail - relatively high on the head in order to be able to put on the hat/headdress easily later.
-Braid the ponytail, with a paranda for added volume (tutorial here). Other options: High donut bun, unbraided, or braided bun without paranda and a donut bun in order to give more volume (a relatively voluminous bun is desirable to serve as an anchor for the hat).
-Coil the braid around the ponytail base in order to create a braided bun. I secured it with two metal bun pins - Something that looks relatively historically accurate, and that doesn't protrude much from the bun, in order not to interfere with the hat later.
-Loop the front accent braids around and over the ears, crisscrossing them at the front and coiling them around the bun.
  • Hennin:
-Wrap velvet band at the hairline and tie at the back. This band serves as anchor in order to secure the hat.
-Put on hennin over the bun. Further secure it with another velvet band tied over the base directly above the other band. This should keep the hennin from sliding back.
-Pin decorative veil over the hennin as desired.


More about hennin construction:


 Materials I used: Buckram/burlap fabric for the base (two layers), wire, long wood sticks (3X), dark red and gold patterned damask  for the lining, normal thread to sew it all. Gold organza for the veil and black velvet for the strips that hold the hennin in place.

Also, some tutorials I studied for this project: Steeple hennin , truncated hennin, another truncated hennin. And my Pinterest board with references.

Fabrics and materials: Gold organza for the veil, black velvet for the strips holding the hennin in place, dark red and gold damask for the lining, burlap/buckram for the base, wire and long wooden sticks.

Initial fabrics test with the materials and a 'fairy/princess' conical hat I've had since I was a child xD (you see the veil from that costume hat popping out there)

Cutting out the shape for the base (two layers):

Initial test of the hennin form with the two layers of burlap cloth and the damask:
Sewing long wood sticks to the first layer of the burlap base to keep the shape and stop the heavy fabric (plus the lining afterwards) from buckling under its weight

Sewed a second layer of burlap over the first one, and added wire around the circumference to further help keep the shape.


Damask lining, and the hennin is complete! Veil is held in place with pins (decorative or not), and velvet strips (one over the hair and beneath the hat, the other over it) keep the hennin in place. The velvet strips I tie at the back of the head and that really keeps the hennin secure with no need for further support.
 
Also sewed the U-front hook that helps adjust the hennin as well:


 Another final test at the Tolkien con while wearing another Elven cosplay:

SwordWomanRiona / rionashairblog.blogspot.com.es
If you copy-and-paste this post and/or alter it without any permission, credit or link, you're stealing my content. In that case, please stop. Please ask before using my work, or at least share it properly, giving credit to me and my blog.