Thursday 15 December 2016

Random December hair update - Elven cosplay and Gimli axe

  • Got the November Flexi-8 of the month, North Star, plus three decorative pins. I can never say no to anything starry (the troubles of being an Astrophysicist? xD), plus I thought they would look cool as part of Elven hairstyles:


Front of the 2017 variation of this style:


  • Hair-colour pic! On my way to see Fantastic Beasts, I realized that my ends looked really red, so I snapped a pic because I'm a hair-colour nerd xD Natural colour at last, after all the Manic Panic fading!
  • One-coil Chinese braided updos
-First one is after coming home from a cosplay convention (Elven ranger cosplay, thus the ears xD), I just bunned-up a high braided ponytail with paranda and two side braids:


-And the second one from today - Made a new paranda yesterday :)!


SwordWomanRiona / rionashairblog.blogspot.com.es

If you copy-and-paste this post and/or alter it without any permission, credit or link, you're stealing my content. In that case, please stop. Please ask before using my work, or at least share it properly, giving credit to me and my blog.

Wednesday 9 November 2016

Hair treatments - Strengthening hair poultices: Cinchona and cassia

Cinchona and cassia hair treatments

A fortnight ago I finally stopped procrastinating and used a boxed hair poultice I had had in my fridge for nearly two years xD 

Like henna, this is a mud-style hair treatment, from the Radhe Shyam brand (their henna is not among the best quality brands because they seem to have a pretty low dye content, although I also like how they give my hair very nice highlights). The treatment is incorrectly named as being 'henna cinchona', though, because there's no henna in the powder at all, only cassia (which has a colourless effect and is not henna, either!). The poultice includes cinchona bark (Cinchona Succirubra), birch leaves, cassia (Cassia Ovobata), nettle and thyme, and it apparently helps to strengthen hair.
I mixed the powder with strong red tea (I like using tea for rinses and treatments because of its reddish tinges and astringent qualities) in order to create the mud-textured poultice and applied it to my hair with my hands (the mud doesn't stain the skin and hair like henna does, and the mud washed out easily with water). Then I covered my hair in a plastic wrap (and some sophisticated rubber bands xD) and waited for about an hour.
Mud selfie xD!
 Because this mud doesn't colour-stain, application, rinsing and cleaning were so much easier than with henna or a vegetal dye! I literally covered the bathroom in mud while applying the poultice on my hair xD, but it was pretty easy to clean with a bit of water. Apart from that, bits of dried powder kept falling off my hair while I was finger-detangling and drying it, but overall it was an easier process than my henna experiments.

My hair felt really soft and shiny after rinsing all the mud off. It also looked a tiny bit more voluminous, I think? It doesn't feel thicker than it normally is now, though, so maybe I'd have to try again to see if it has a thickening effect (maybe after more applications?), like henna or cassia treatments. A fortnight later, I haven't noticed really noticeable changes in the strengthening department, but I'd probably need repeated, or at least more, hair treatments like this one for that, and this box was already two years old, fridge or no fridge. So pretty happy on the whole :)

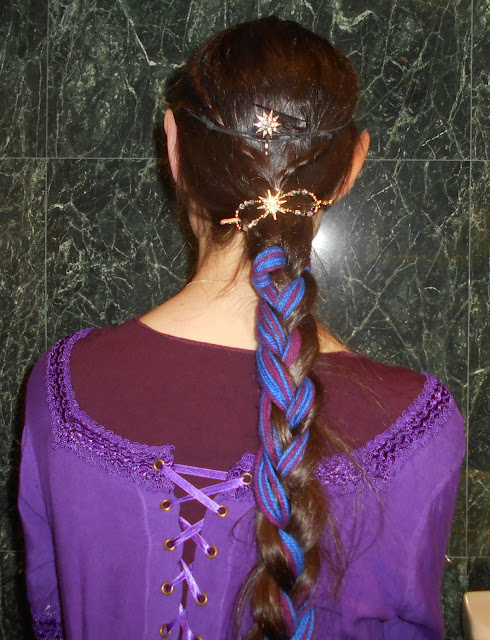
This is also an October length shot!
And some pics of the post-poultice hair:

Nighttime with flash:

And in the morning, indirect sunlight with flash:


I've also done a couple of 100% Cassia treatments, from the same brand, and this 2011-12 treatment I remember especially, because it did leave my hair feeling more voluminous and a bit thicker :)


Pros (judging by  my personal experience):
  • Easy to clean and rinse out compared to staining muds like henna (I LOVE henna, though xD)
  • Soft, shiny hair
  • Hair is a bit more voluminous
  • I like the slightly bitter, herbal scent, so that was also a plus for me
Cons:
  • Mud-treatments always mean mud literally everywhere, even if it cleans off easily xD You also have to sweep the floor at least once to get all the drying powder that falls off your hair when drying. Not a low-maintenance process.
SwordWomanRiona / rionashairblog.blogspot.com.es

If you copy-and-paste this post and/or alter it without any permission, credit or link, you're stealing my content. In that case, please stop. Please ask before using my work, or at least share it properly, giving credit to me and my blog.

Wednesday 2 November 2016

Hairstyles - Noldorin Elf cosplay crown braided updo: Rope-braid version

Yesterday I did a Rivendell Elf cosplay shoot in some public gardens and went, once again, for a crown-style braided updo for my Noldorin Elf OC (Both my personal headcanon and some Tolkien references describe Noldorin ladies as wearing braided updos (crown braids or other), and bejewelled hairnets, snoods and tressures). So far, I have tried three variations:

1. A rope-braided, hair-taping inspired crown updo:


And now, 
3. Same updo as 2., but with rope braids instead of three-strand braids. 


  • For this style, I used:
-An elastic without metal for the initial ponytail.
-Two parandas (info about making parandas and braiding them into hair here). Parandas are optional, but a nice addition if you want added volume and colour. You could also use ribbons and/or (metallic) cord.
-Bobby pins (closed and open). Lots of them in my case xD

  • Steps (video tutorial planned!):
The steps I followed for this 'Noldorin updo' are nearly identical to the Three-strand braided crown-style updo, only I did rope-braids in this case.

1. Pull your hair into a high ponytail (or a low one, I went with a high one) and secure it with a hair-friendly elastic without metal.
2. Divide your hair into two parts. Braid each section (rope braiding), adding a paranda (optional).
3. Pin each braid around your head with closed bobby pins. I pinned one braid first until I reached the elastic at the back of the head (and left the rest hanging), and then pinned the other in front of the first one. You can also criss-cross them. 

4. Wrap and pin the remaining length of both braids around and over the elastic at the back, hiding it and creating a bun.

5. I added an amethyst hair pin as final decoration

More hair pics from the shoot:


SwordWomanRiona / rionashairblog.blogspot.com.es

If you copy-and-paste this post and/or alter it without any permission, credit or link, you're stealing my content. In that case, please stop. Please ask before using my work, or at least share it properly, giving credit to me and my blog.


Thursday 20 October 2016

Hairstyles - Braided buns (with paranda and without)

This bun is very similar to the Chinese braided bun, only the hairstick (you can also use a fork) is added after you start coiling the hair around the ponytail base:
And pics:


A messy braided bun at the end of the day xD:


And a couple of random braided buns without a paranda:


SwordWomanRiona / rionashairblog.blogspot.com.es

If you copy-and-paste this post and/or alter it without any permission, credit or link, you're stealing my content. In that case, please stop. Please ask before using my work, or at least share it properly, giving credit to me and my blog.