Showing posts with label accent braid. Show all posts

Sunday, 19 July 2026

Cosplay styles - Elrond braided half-up and length shots


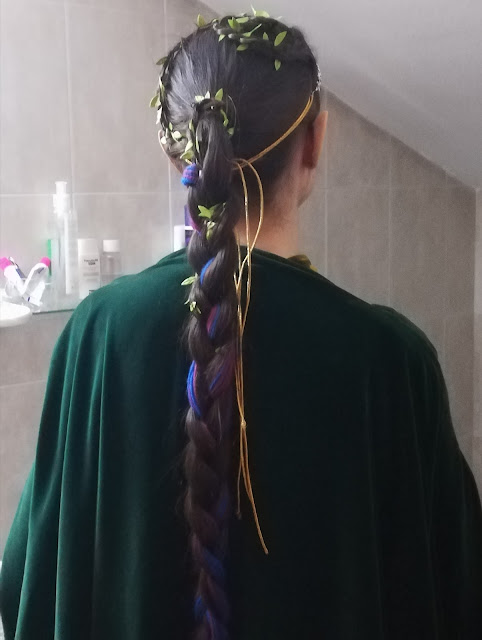
  Long time, no cosplay hair post! So here's another Elven style, a couple of multi-braided half-up styles for my Elrond cosplay, from an Autumn 2022 nature shoot. The main style I went for is a couple of thin three-strand side braids in front of the ears alongside a fishtail/herringbone half-up braid at the back (well, a fishtail braid that evolved into a regular three-strand braid, because fishtail braiding at the back of your head is not for the weak-minded and is a real workout 😅 xD). 

  This style takes elements out of several Elrond hairstyles from the Peter Jackson movies: LotR Elrond tends to wear a fishtail half-up braid at the back with intricately looped sections in front of the ears, and sometimes, more intricate criss-crossing basket weaving braiding at the top of the head as well (see photo below, left).  In the Battle of Dagorlad (during the Fellowship of the Ring prologue, see photo below, middle) his style combines the fishtail braid at the back with two side fishtail braids looped into and around the main herringbone braid. Elrond's main style in the Rivendell scenes of The Hobbit: An Unexpected Journey (see photo below, right) features a couple of three-strand braids in front of the ears instead of his signature looped look in LotR, and he switches the more elaborate fishtail and basket weaving braiding for what looks like a couple of side rope braids tied at the back alongside another minibraid at the top of the head. 

LotR Rivendell Elrond (FotR, Council costume) (left); LotR Battle of Dagorlad Elrond (centre); The Hobbit: An Unexpected Journey Elrond (right) 
 

  My version combines the fishtail braid at the back from most of the LotR styles with the three-strand braids in front of the ears from The Hobbit, which I tried to loop a bit at the ends as a callback to his signature LotR look (but three-strands overall were easier to do and more comfortable to wear). I actually could also replicate a near version of his Dagorlad style with this look (see below), by looping the front mini braids into and around the main braid at the back (the only difference being, in the Dagorlad style it's all fishtail braids, but lol nope, I tried that style with what I already had at the very end of the shoot xD).

  • For this style I used (and you can use):
-Sectioning comb, wide-tooth comb and/or brush, as needed
-Transparent small elastics for the accent braids and the braided half-up
-A circlet and a leaf slide/barrette for decoration
-Aloe vera gel/fixing gel, as needed 
  • Steps:  
1) Section the hair: one small section at each side above the ear for the accent side/front braids that will hang in front of the ears, and one section for the braided half-up at the back.
 
2) Fishtail+three-strand braid:
 
  To be honest, I've had very little practice doing fishtail/herringbone braids because they're pretty time-consuming and they involve considerable arm workout when you're doing them at the back of your head xD, but I was happily surprised to see that, considering the little practice I had, this one didn't turn out so bad and it was a bit easier to do than I had dreaded! Still, hard on the arms, and I was running late for the shoot, so it's not a fishtail all the way down - one third down (or so), it ended up morphing into a regular three strand đŸ€Ł. Still, I think it still looks pretty cool as is! And it's a good hack if you also have long, long hair and don't want to spend so long fishtail-braiding xD. I secured all sections of this braid with transparent elastics.


3) Accent side-braids:  Separate a piece of hair at each side and braid it. It can be a simple 3-strand braid, or a lace braid, French braid or Dutch braid. In this case - three strand, imitating Elrond's main hairdo in The Hobbit movies. You can rest your arms a bit more with this step, even if mini braids can also be pretty time consuming with very long hair. Secure with transparent elastics.
 
4) Final touches:  I added a thin circlet, tied at the back with some golden cord and also secured with a silver leaf barrette (which also serves to hide the knot). You can also use bobby pins/open pins as needed to fix anything in the braids.
 
Add aloe vera gel or a bit of gel or hairspray to set the style and potential flyaways (if you want), and it's done!


For the Dagorlad style, I just looped the front mini braids into and around the main back braid. I tried this at the end of the shoot, and also ended up wearing the style as an updo, with a fork and a casual cinnabun :


  I also used these couple of video tutorials as reference, from Loepsie and Silvousplaits: 


Picture gallery with more shots from the 2022 cosplay shoot, also feating mid-thigh length shots:


SwordWomanRiona / rionashairblog.blogspot.com.es

Do not copy-and-paste this post and/or alter it without any permission, credit or link. Ask before using my work, or at least give credit to me and my blog (beauty site who kept stealing my content a while ago, I'm looking at you).

Friday, 29 April 2022

Hairstyles - Hairstick bun with side braid

 This is a style I wore for a concert outing back in 2016, with a side French braid and my one-coil variation of a hairstick bun which is typically called the 'Chinese bun' in hair forums (not because of the hairstick per se, I don't think, as there are many buns and updos that involve hairsticks. But I'm not sure as to what origin the forum name for the style actually has, and if it's a similar example to a braid being referred to as 'French' or 'Dutch', or if the origin is more stereotypical in nature :S Just in case, I now tend to call this a one-coil 'hairstick bun' in a more neutral way).

For this one-coil bun I used my Hairjems cobalt hairstick with detachable dangles, using just the short detachable dangle around the bun, as well as a star hairpin I got during a 2012 trip to Vienna.


Tutorials and associated blog posts:

-One-coil hairstick 'Chinese' bun. YouTube tutorial included, also here:


-French braids

-Side braids

YouTube tutorial will come sometime in the future, for now here's a couple of clips showing the style:

 
SwordWomanRiona / rionashairblog.blogspot.com.es

I've been having trouble lately with some B*tcoin scam links that keep appearing on some of my posts. I did NOT put them there, please if you see them do not click on them, I'm still working on the issue. I have not intentionally enabled AdSense on my settings, so any ads that might appear on my posts are there without my intent :S.
 
Do not copy-and-paste this post and/or alter it without any permission, credit or link. Ask before using my work, or at least give credit to me and my blog (beauty site who kept stealing my content a while ago, I'm looking at you).

Wednesday, 2 February 2022

Cosplay styles - Rivendell Elf multibraided ponytail

Today's cosplay hair post is another Elven style, this time for my Rivendell Elf formal robes from a 2018 convention.  It's a braided paranda ponytail with a side braid coiled around the head and joining the main braid, decorated with leaf ribbon. A thin circlet with small leaves finishes the look.


  • For this style I used (and you can use):
-Wide-tooth comb and/or brush as needed
-A metal-free elastic for the initial ponytail
-Open pins, bobby pins (as needed)
-Paranda for the braid
-Leaf ribbon (or similar ribbon)
-A circlet
-Hairspray and/or fixing gel and/or aloe vera as a light fixator, as needed  


  • Steps:
1) Side braid: Separate a piece of hair at the side and braid it, adding ribbons (in my case, I used leaf ribbons). It can be a simple 3-strand braid, or a lace braid, French braid or Dutch braid.

2) Braided paranda ponytail: 
 
-Pull the rest of the hair into a high ponytail - mid-height is my preference -, and secure it with a metal-free elastic. 
 
-I didn't take a lot of clear pics, but what I did next is coil the beribonned side braid around my hair is a half-spiral, half-headband shape (I basically didn't have anything planned and improvised xD), securing it with open and closed pins as needed, and finally coiling it around the ponytail base and securing it there as well.
 
 -Braid the ponytail, with a paranda for added volume, and including the accent braid in one of the three parts (tutorial here). 

 
 3) Final touches: 
 
-I use a couple of open bun pics to polish some flyaways at the nape.
 
-Add aloe vera gel or a bit of gel or hairspray to set the style and potential flyaways (if you want), and it's done!
 
During this same convention, I also made a simpler half-up with two three-strand beribboned side braids with the sale leaf ribbon, braided together into another three-strandat the back, plus braidwaves and a circlet:


SwordWomanRiona / rionashairblog.blogspot.com.es

Do not copy-and-paste this post and/or alter it without any permission, credit or link. Ask before using my work, or at least give credit to me and my blog (beauty site who kept stealing my content a while ago, I'm looking at you).
 

Monday, 13 January 2020

Hairstyles - Braided buns with side braids


  • Braided paranda buns with a lace side braid:
I really like the look of a side braid paired with a braided bun. I usually go for either a plain 3-strand or a lace braid, and often favour the look of just one side braid when I lace braid (and often go for the two when doing 3-strands).
  • For this style I used:
-Comb and brush as needed. 
-Aloe vera gel as light fixator and flyaway-tamer when braiding and bunning (optional gel and/or finishing fixing spray as needed)
-A metal-free elastic for the ponytail
-Open pins for the side braid and/or bun. Bun pins (hairsticks, forks or spin pins can also be used).
-Paranda for the braid
  • Steps:
1) Separate a section of the hair at one side (I usually choose the right side) and lace braid it. I use aloe vera gel to help make the braiding easier and smoother. Secure the braid to the side with open pins as needed.

2) Pull the rest of the hair into a high ponytail (I go for medium height). Add the side braids before securing it with a metal-free elastic. 
 
3) Braid the ponytail, with a paranda for added volume (tutorial here). 
 
4) Coil the braid around the base of the elastic to create a braided bun, and secure with bun pins (or sticks/fork/spin pins), with additional open pins as needed.

5) Final touches: I use a couple of open bun pics to polish some flyaways at the nape and add more aloe vera gel/a bit of hairspray to set the style and potential flyaways.


Pic gallery


SwordWomanRiona / rionashairblog.blogspot.com.es
If you copy-and-paste this post and/or alter it without any permission, credit or link, you're stealing my content. In that case, please stop. Please ask before using my work, or at least share it properly, giving credit to me and my blog.

Monday, 9 April 2018

Historical styles - 15th Century Burgundian braided updo and conical hennin

Today's hairstyle post is about historical reenactment and the Middle Ages - The updo I wore for my late 15th Century Burgundian reenactment, under a conical hennin:

I actually debuted this reenactment at a Tolkien convention, so all these pics are a Noldorin Elven version (those are actually Vulcan ears, I didn't have any Elven ears at that point xD). 15th Century Burgundian fashion wasn’t a headcanon of mine for Elven fashion before this, but I can totally see the (in my headcanon at least) quite fashion-extravagant Noldor wearing this kind of court fashion xD And the looped braids kind of showcase the pointy ears, too!


The hairstyle is something that can easily be worn under the hennin, and it’s also inspired in what can be seen of the hair (ugh for the patriarchal modesty mindsets :S) in illuminations from the time - There are examples of looped braids that show under the hennin (1, 2, 3), and examples of the hair being worn in a high bun under the hennin. In my case, it’s a braided high bun with a paranda (no foam donut in my case, although that’s another option). The two front accent braids are braided with golden cord and looped around the ear, crisscrossed and tucked around the bun. For an alternative Elven-inspired style, those front braids could also be worn hanging loose (this is actually how this Burgundian woman wears her hair, too!)
  • For this style I used:
-Comb and/or brush as needed.
-A metal-free elastic for the initial ponytail
-Paranda for the braided ponytail (or a foam donut, or both. Both resulted in an overlarge, too heavy bun in my case).
-Lots and lots of pins (open bun pins and closed bobby pins. Like, LOTS.
-Fixator, like hairspray
-Tangle Teazer to untangle the root backcombing easily and damage-free.  Baby brush to brush off the hairspray and smooth all the hair
Steps:
  •  Hairstyle:
-Separate two front sections and braid to create the accent braids. Add cord or ribbon as a decorative effect if desired.
-Pull the rest of the hair into a high ponytail - relatively high on the head in order to be able to put on the hat/headdress easily later.
-Braid the ponytail, with a paranda for added volume (tutorial here). Other options: High donut bun, unbraided, or braided bun without paranda and a donut bun in order to give more volume (a relatively voluminous bun is desirable to serve as an anchor for the hat).
-Coil the braid around the ponytail base in order to create a braided bun. I secured it with two metal bun pins - Something that looks relatively historically accurate, and that doesn't protrude much from the bun, in order not to interfere with the hat later.
-Loop the front accent braids around and over the ears, crisscrossing them at the front and coiling them around the bun.
  • Hennin:
-Wrap velvet band at the hairline and tie at the back. This band serves as anchor in order to secure the hat.
-Put on hennin over the bun. Further secure it with another velvet band tied over the base directly above the other band. This should keep the hennin from sliding back.
-Pin decorative veil over the hennin as desired.


More about hennin construction:


 Materials I used: Buckram/burlap fabric for the base (two layers), wire, long wood sticks (3X), dark red and gold patterned damask  for the lining, normal thread to sew it all. Gold organza for the veil and black velvet for the strips that hold the hennin in place.

Also, some tutorials I studied for this project: Steeple hennin , truncated hennin, another truncated hennin. And my Pinterest board with references.

Fabrics and materials: Gold organza for the veil, black velvet for the strips holding the hennin in place, dark red and gold damask for the lining, burlap/buckram for the base, wire and long wooden sticks.

Initial fabrics test with the materials and a 'fairy/princess' conical hat I've had since I was a child xD (you see the veil from that costume hat popping out there)

Cutting out the shape for the base (two layers):

Initial test of the hennin form with the two layers of burlap cloth and the damask:
Sewing long wood sticks to the first layer of the burlap base to keep the shape and stop the heavy fabric (plus the lining afterwards) from buckling under its weight

Sewed a second layer of burlap over the first one, and added wire around the circumference to further help keep the shape.


Damask lining, and the hennin is complete! Veil is held in place with pins (decorative or not), and velvet strips (one over the hair and beneath the hat, the other over it) keep the hennin in place. The velvet strips I tie at the back of the head and that really keeps the hennin secure with no need for further support.
 
Also sewed the U-front hook that helps adjust the hennin as well:


 Another final test at the Tolkien con while wearing another Elven cosplay:

SwordWomanRiona / rionashairblog.blogspot.com.es
If you copy-and-paste this post and/or alter it without any permission, credit or link, you're stealing my content. In that case, please stop. Please ask before using my work, or at least share it properly, giving credit to me and my blog.