Monday, 2 June 2025

Henna journey - 2019

  Another henna journey post incoming 😃! In timey-wimey fashion xD, I have already covered first the 2022 and the the 2020-1 henna'ings, and today is 2019's turn. My henna adventures started in 2010-11, followed by  a Manic Panic experiment in 2013, a long hiatus after that, and then the return of the henna again in 2019 until today. This post, as per usual, will include a hefty pic spam xD.

See this post about my 2022 henna'ings for the henna post with the most comprehensive info about the general benefits of henna and the benefits that I have noticed for my hair especifically, and I also delve in more detail in that post on how often I use henna, which brands I use, how much henna I need for both complete length dyes and root retouches, and how the henna application and general henna'ing process looks like for me. In this post I'll also be mentioning some of these details, but check this other post for a more detailed overview! And, as per usual, get ready for silly pics during and after the henna application 🤣👍!
 

2019 September henna'ing

The 2019 mix: Three boxes of (expired xD) Jamila henna and two boxes of (stale-ish xD) Radhe Shyam henna. 

   In September 2019 I went back to henna after a very long hiatus (my 2013 Manic Panic experiment was the last time I had dyed my hair). This henna was a bit of a fail because welp, although I was lucky to get some Jamila henna as part of an online hair swap back in 2015-6, I didn't use it until 2019, so of course, it had long since expired 😅. I had kept it frozen all those years, and some dye still remained, so I did get some lovely red tones for a while (even if not as intense as with later henna'ings). But the colour did fade a lot after the first month or so 😭 (with fresh henna the tone may fade a little bit over time, depending on the hair porosity and the henna brand, among other things, but it pretty much stays put otherwise). 

The two henna powders, which I mixed with a strong infusion of red tea and hibiscus flowers, as well as a tablespoon of lemon juice.

  To try to boost the weakened henna dyeing power of my years-long-expired Jamila, I mixed the whole 250 g of Jamila henna with 200 g of fresher (but not by a whole lot) Radhe Shyam henna - which is a brand that I have used on and off, and I actually started my henna experiments back in 2010-11 with Radhe Shyam (and used it again in 2020-23 alongside my now favourite Khadi brand), but my general consensus is that it's definitely not the freshest or strongest henna on the market, for sure. I have always experienced less intense results and faster fading with more than one Radhe Shyam box, as compared to Khadi henna, for example.   

  For this henna'ing session, I dyed my whole hair, and the full head of hair I of course have to use rather more than I usually do for my root retouches. Usually, in this case I tend to use approx. 300 g (three boxes) for my (usually) mid-thigh and (F ii/iii) hair. This time, though, it was a whopping 450 g (5 boxes!!), as I wanted to use all of the Jamila in one go, and also had to add at least some Radhe Shyam to boost the dyeing power as much as possible.


   I mixed the henna powder with a strong infusion of red tea and hibiscus, which I routinely did with my 2019-23 hennas to try and enhance the red tones (now I've read that it doesn't really do that much to enhance the red tones of the dye, really, if anything it's a really subtle effect, so lately it's just been warm water). For the acidic dye boost, I now use and a couple tablespoons of vinegar for the acidic dye boost, but in 2019-23 I used freshly-squeezed lemon juice, with can be harsher for the scalp and also promotes a darker result (which is not what I'm currently going for, I prefer copper to true red highlights generally) - so I now prefer to use a milder acid like vinegar, preferably apple cider vinegar). After mixing the henna powder with the warm infusion and the lemon, I left both mixes - the Jamila and the Radhe Shyam - to oxidize overnight, something which may or may have not helped in releasing some of the remaining dye in my stale 2019 henna mixes 😅. From 2020 onwards, however, I mix my (mostly Khadi, some Radhe Shyam) henna paste shortly before use and I've experienced strong dye releases in this way, with no need to leave the mix to rest overnight. Henna'ing is time consuming as it is, so that works for me xD.


 The next day, I used some of the remaining tea and hibiscus infusion to stir the henna paste into the right consistency again and mixed the two henna types together. Back then, I had pretty much henna'ed my hair twice (in 2010 and 2011), so my finesse and my practice was very much lacking - so when it came to actually applying the henna I did a mess of epic proportions in the bathroom 🤣🤣. To see the whole sink full of plastic bags and everything stained muddy and orange (at least there was some dye left confirmed xD) makes for amusing pictures, for sure, but my gods, was it difficult to clean it all up. Fortunately, the bimonthly henna process nowadays (involving mostly root retouches) is much easier and makes a minimal mess at the kitchen table xD. But back in 2019, I finally succeeded in finishing up and wrapping my henna'ed hair in tin foil and plastic shower cap, and waited some 3.5 hours before rinsing it all off (I do 2 hours of waiting time nowadays, but with the weaker dye release I wanted to make everything count as much as possible xD).

LOL xD


 The initial results were quite nice, overall, the hair had intensified auburn red tones and felt a little thicker, and the scalp felt cleaner as well (as is usual with henna use). But yeah, like I said, after the first month or so the colour faded quite appreciably 😅, until I henna'ed again in September 2020, a year later. But here are some pictures of these henna results while the full intensity of the colour lasted 🤩:

These are from the same day of the henna'ing, just after the hair dried, night-time, fluorescent light:


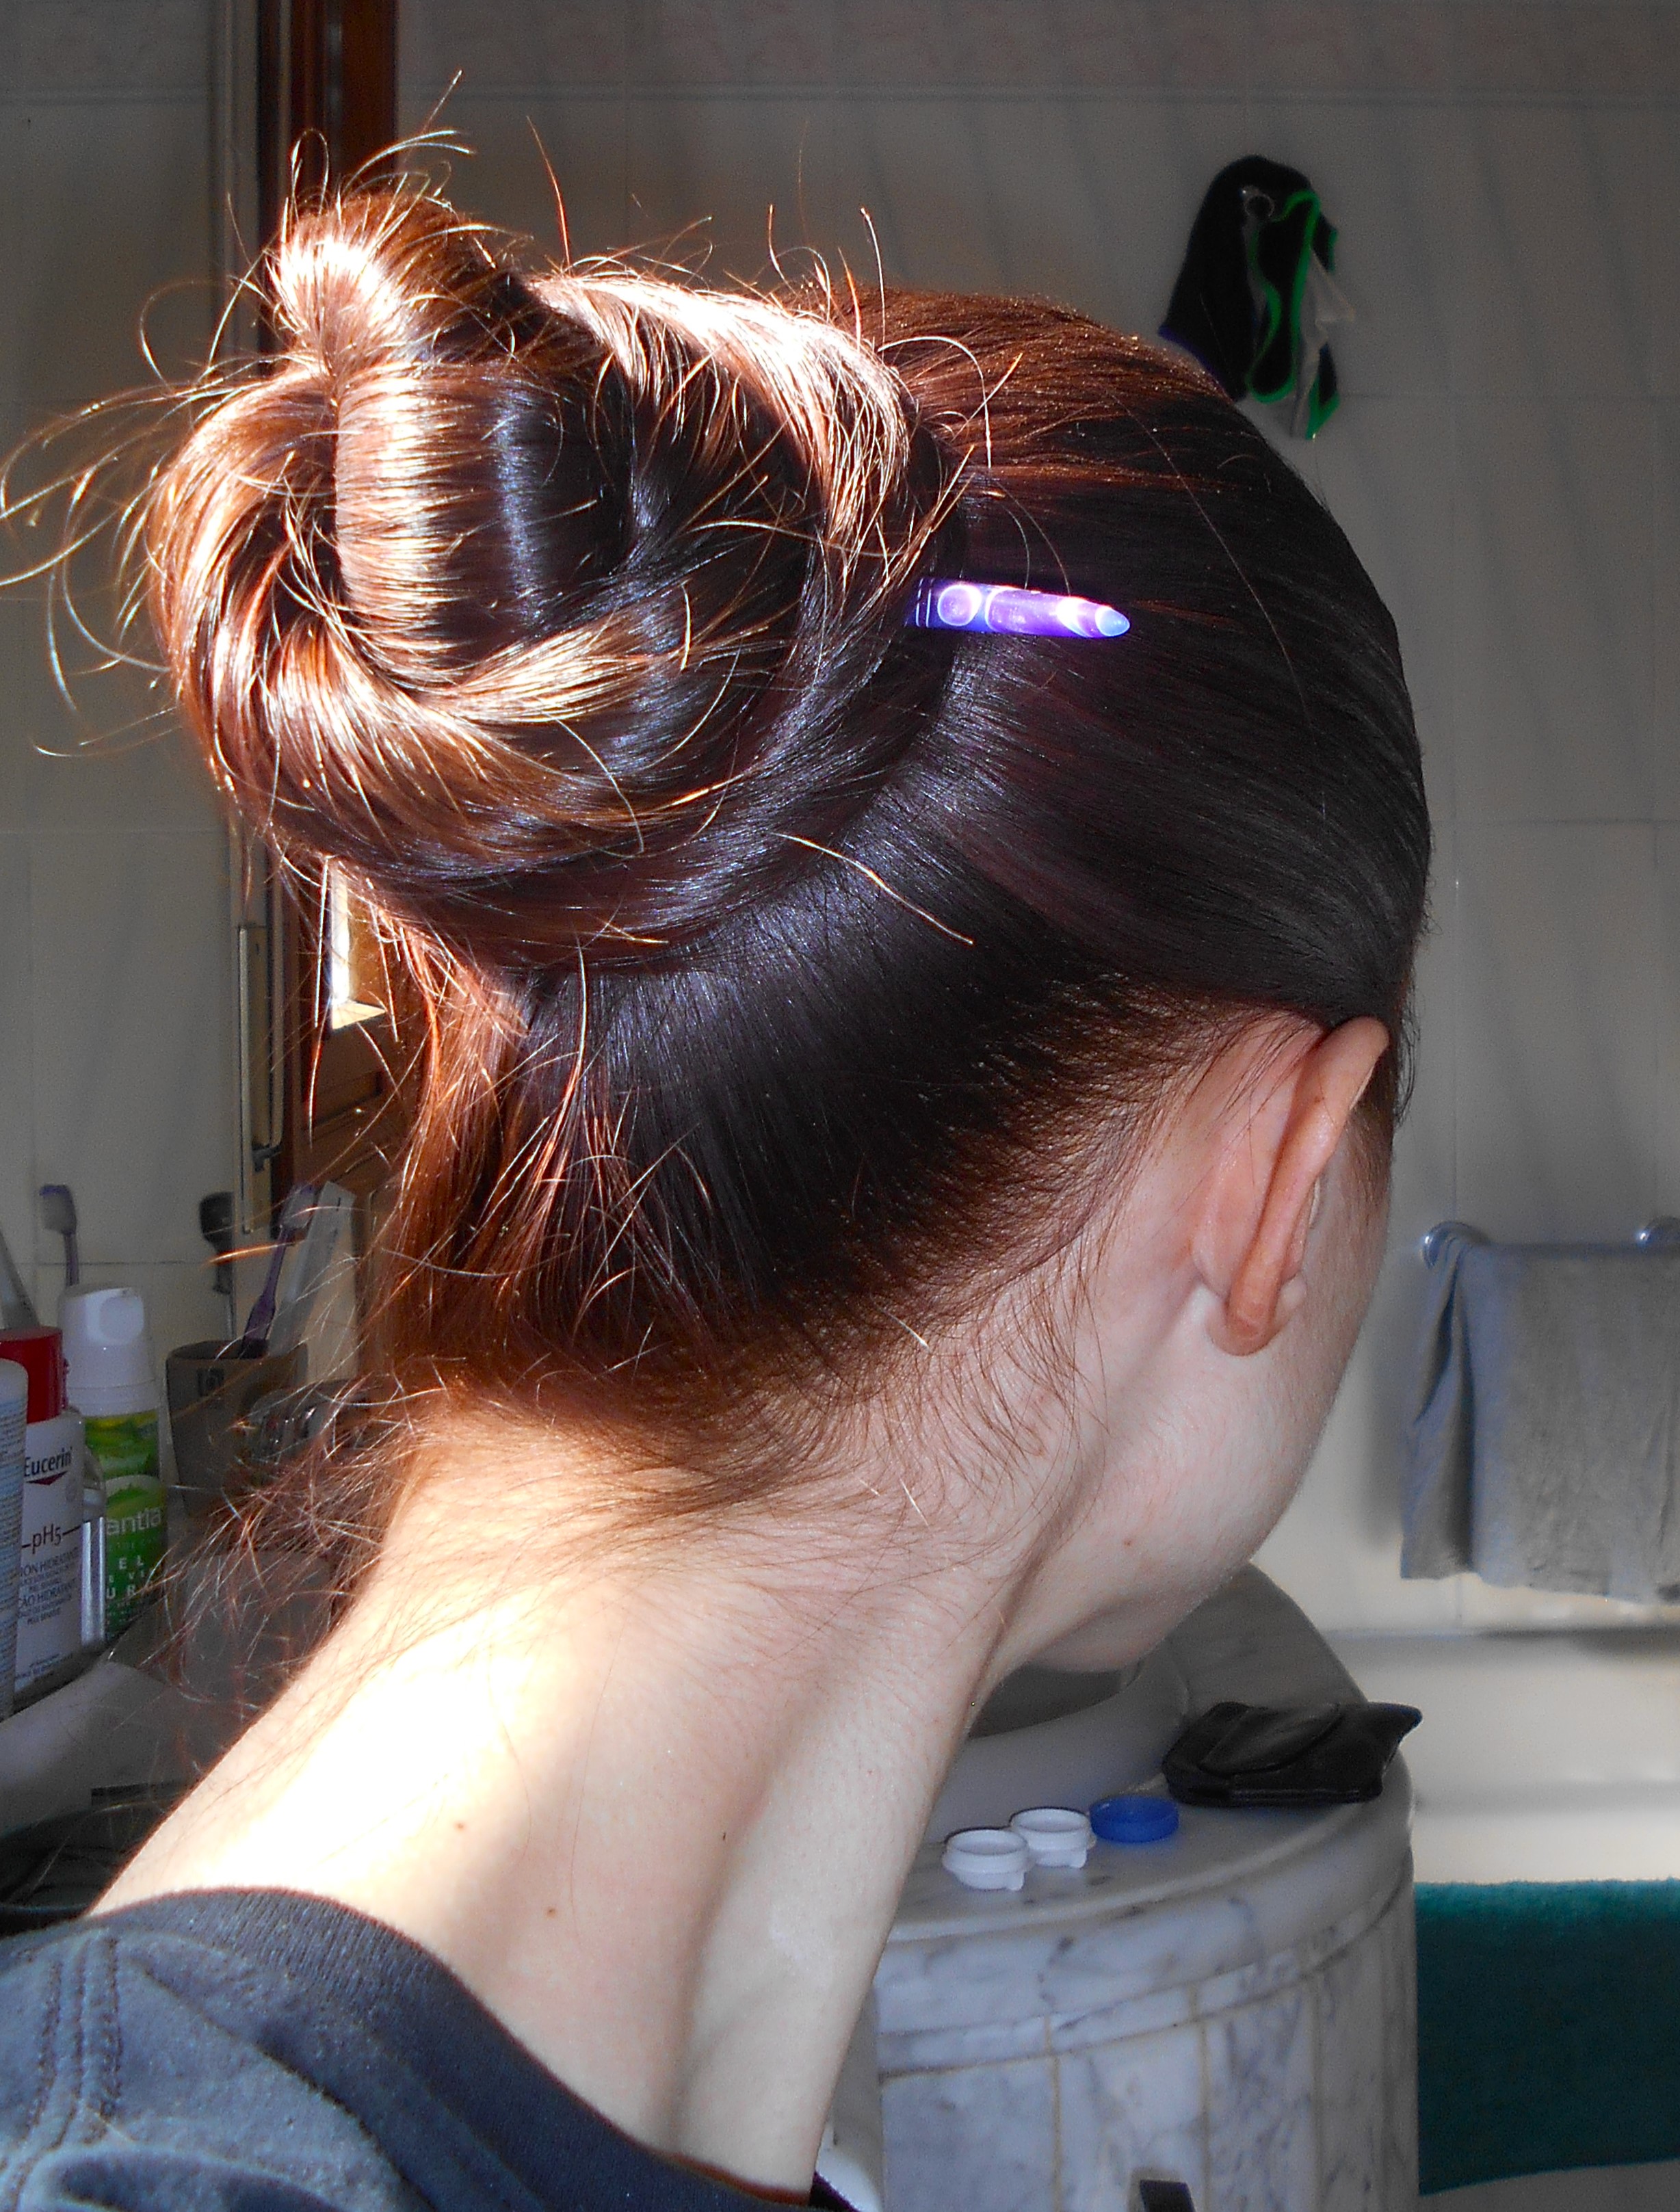
The morning after, direct sunlight:

  And some pictures during the first week and month (approx.) after henna'ing, in durect and indirect sunlight, and also featuring a cinnamon bun (cinnabun) and a Valkyrie (knotted) ponytail, one of my favourite go-to length-shortening styles


SwordWomanRiona / rionashairblog.blogspot.com.es

Don't copy-and-paste this post and/or alter it without permission. If you want to share this work, please give credit to me and my blog.

Friday, 10 January 2025

Cosplay styles - The Eärien hairstyle (Rings of Power; Númenor and Elven OC cosplays)

Númenórean court astronomer OC, with a hairstyle inspired by Eärien's main style in S1 of Rings of Power

Back in August 2024, I cosplayed two Tolkien OCs (original characters) (more on my cosplay on my IG and TikTok), using the same basic outfit (the gorgeous 'Princess in Exile' burgundy dress and black chemise combo from Armstreet 😍) and pretty much the same hairstyle: First came a Númenórean court astronomer OC, and for this character I chose a hairstyle that was directly inspired by the braided half-up that Númenórean Eärien wears in season 1 of the Rings of Power series ✨🏰🌊🔭⌛📚📜. Then, in late August, I attended the Madrid première of the second season of Rings of Power, thanks to the invitations gifted by our Spanish Tolkien Society 😊✨💍⚔️, and for that I chose pretty much the same get-up, only now I was cosplaying as an Eregion Noldorin Elf OC, so I added more Elven-inspired jewelry (like a circlet) to this hairstyle doubling as an Elven style, and, of course, the pointy ears. The overall style and decoration of this Armstreet dress gives me both Númenórean and Noldorin aesthetic vibes, and we love versatility in cosplay, so yay xD ✨.

Elven variation of this look at the Rings of Power S2 Madrid première

My personal version of Eärien's style consists of two 3-strand side braids, braided with purple parandas, tied at the back of the head with an elastic, and then forming a half-up braided bun. When wrapping the braids around the elastic, I started wrapping both braids twice or thrice, then added a hairstick to keep them in place (using the elastic as an stronger anchor point). The rest of each braid is twisted around the hairstick a bit more loosely, letting one of the two braids hang a bit below the bun, similarly to how Eärien wears them (this is more clearly defined in one of the two versions I ended up with). Finally, I used a blue beaded necklace as decoration, tying the strings around and below the braided bun:

The Númenórean version...
...vs the Noldorin version
The inspiration: Eärien's Númenórean look in S1 of Rings of Power

  See here below for a quick tutorial and the obligatory pic spam, including pictures from both cosplays, which share pretty much the same hairstyle, with some minor differences. My take on it for the Noldorin Eregion OC, for example, resulted in a braided half-up bun that was a bit more compressed in shape, compared to how the Númenórean style turned out (this is ironically more in line to how Eärien actually wears it xD), although the hanging part of the braid is seen more clearly in my Númenórean version. Apart from that it's pretty much the same style, minus the decorations: For my Númenórean OC, I wore the hairstyle as is, with just parandas and a dangling beaded necklace as the decorative elements. For my Noldorin OC, seeing as the Noldorin Elves of Eregion are famed as artisans, crafstpeople, jewellers and smiths, I added a little more bling (Noldor in general do love their bling and their gems ✨xD), in the form of a necklace with blue crystals acting as a circlet, plus a more ornate necklace, and, of course, a ring xD 😅👍💍.

✨Also check out my other cosplay styles!

The Elven version

  • For this style I used (and you can use):
  -Comb and/or brush as needed.
 
  -A metal-free elastic to tie the two side braids at the back of the head.

 -Open pins and bobby pins (as needed): to help secure the braided half-up further, or to aid in anchoring the accessories like the necklace-circlet. 
 
 -Parandas for the side braids.
 
 -A hairstick to fix and anchor the braids in the half-up. Alternatively, you can also use a fork, or if you'd rather no hairtoy showed, also smaller clips or spiral pins.
 
  -A beaded necklace as decoration, tied below and around the half-up.

  -A circlet (for the Elven version) - be it a regular circlet or a necklace acting as one. To keep it secure, I added some thin wool strands to each end and and tied them around the braided-half-up, further anchoring the necklace at the sides with bobby pins. 

 -Hairspray and/or fixing gel and/or aloe vera as a light fixator, as needed.

The Númenórean version

  • Steps:
1) Side braids: Separate a piece of hair at each side and braid it, adding a paranda for added volume and colour (video tutorial  here). I went for simple 3-strand braid, but you can also go for a lace braid, French braid or Dutch braid.


2) Forming the half-up
 
-Secure both side-braids at the back using a metal-free elastic. If the braids don't lie flat against the head at the sides, you can use a couple of open pins to help, and also some aloe vera gel/hairspray/hair wax or your fixator of choice to keep the flyaways at bay.
 
-Start coiling each braid around the elastic base 2-3 times (this depends on the starting length as well), and then add a hairstick or fork (speared through the elastic for a firmer anchoring point) to start securing the half up. Instead of a hairstick or fork, you can also use clips or pins (spiral or open).
 
 -Twist the rest of each braid around the hairstick, but a bit more loosely this time, letting one of the two braids hang a bit below the bun as you coil it, so that it hangs below the rest of the braided half-up. Secure with additional pins as needed.

 
 3) Final touches
 
-For the decoration that Eärien wears below the braided half-up, you can use a beaded necklace or beaded strings, wrapped around the below the braided bun. For a more Elven look, you can also add a circlet.

-The rest of the hair hangs loose. Add texture to the length and ends if you wanna (braidwaves or curls). I chose to wear my hair in its natural straight form.
 
-Add more aloe vera gel or a bit of gel or hairspray to set the style and potential flyaways (if you want), and it's done!


More pics:
 
🔭Númenórean OC


💍 Eregion Noldorin Elf OC:


SwordWomanRiona / rionashairblog.blogspot.com.es

Do not copy-and-paste this post and/or alter it without any permission, credit or link. Preferably ask before using my work, and if you do, please give credit to me and my blog (beauty site who kept stealing my content a while ago, I'm looking at you).