Sunday, 23 February 2014

Hairtoy weaponry: Spanish rapier mini-sword :)

If you are fond of weapons and martial sports and/or fighting activities, it's a cool idea to wear mini-weapons in your hair! There are some hairtoys in the shape of swords, daggers, spears, arrows, axes and other weaponry, but letter openers and decorative mini-swords (all relatively safe and, of course, blunt!) can work as well. They work in the same way as hairsticks.

I love martial sports such as sword-fighting and archery, so hairtoy weaponry is something I certainly wish to invest upon :). The hairtoy-workable swords I have at the moment include an Arthurian-style sword, a Spanish rapier, a Celtic sword letter-opener (which I'm afraid it's too short to hold my hair efficiently and will remain solely as a letter-opener), and mini-replicas of Gandalf and the Witch-king's swords (the Witch-king sword is too long and potentically dangerous, but Glamdring does work relatively well). After being enabled via the LHC (here: http://forums.longhaircommunity.com/showthread.php?t=100912), Tauriel's daggers, Arwen's sword Hadhafang and Thorin's sword Orcrist are now in my wish list for hair-swords.

This post is for my newest hair-sword, a mini Spanish rapier that works really well, especially in a cinnamon bun. I've been doing ancient 17th Century Spanish sword-fighting for a bit more than a year now, too, so it matches with my real life rapier :D

It practically doesn't need any more support to keep the bun secure for the whole day (apart from the elastic - I usually do cinnamon buns with elastics for the additional security).

Bonus for Vampire Red shine :) and fandom-geeekiness - yes, that's Sherlock's coat from the BBC series! 

Alternative: Acting as holding hairstick in an improvised braided Chinese bun with a paranda (I'll be talking about the awesome things about parandas, and about Chinese buns, in future posts). Messy bun, too, because this was taken at the end of the day and my slippery hair loves to stick out of updos.

And bonus 2: My real life Spanish rapier :)

Sunday, 9 February 2014

The Flipped bun


Probably my favourite bun to date, or at least the one I wear the most. I like it because it's pretty quick and easy to do, and yet looks very elegant, imo - In both its more messy and more polished variations. It also holds really well all day. 

I learnt how to do it thanks to Habioku's video:
Flipped bun tutorial by Habioku

And this is my tutorial:
  •  Written instructions, with my own variations to Habioku's flipped bun:
   1) Gather your hair in a ponytail (no elastic needed). The higher the ponytail, the higher the bun will be on the head.
   I usually start gathering my hair in a high ponytail rather than a low one. Low buns tend to bother me more, and I also prefer the aesthetics of buns high on the head. 
   A high flipped bun, especially if secured with a sfork or hairstick(s) with adornments at the top, can also serve to make the face appear a bit longer. Not a necessary illusion all non-oval faces have to achieve, of course (I'm square-faced, and proud).
   High polished buns also draw attention to the nape of the neck, creating an elegant look, imo.

   2) Twist and coil your hair in a cinnamon bun. Flip the cinnamon bun, taking care that the ends remain inside (unless you aim for a messier, windswept flipped bun, then by all means let them stick out of the bun).
  I usually tuck my ends around the bun instead of letting them lie over it. When I flip the cinnamon bun, they're still tucked inside and protected. I sometimes let them stick out a bit too, though, for a messier look.
   I also usually don't rotate the bun. I just coil the hair around one of the hands in a cinnamon bun and flip it over.
 
   3) Secure the bun. You can use a fork, a hairstick or a pair of hairsticks, or spin pins and/or claw clips.
   Because my hair is so slippery, I usually use a fork/stick/pair of sticks, and then further secure the bun by adding a couple of small claw clips or some spin pins. That way it stays secure all day without me needing to restyle my hair.

And pics!
  • With a fork:

Messy flipped bun with ends sticking out vs more polished flipped bun.
Side view from both sides (two different days). The left one is more polished, the right one is more messy/casual


  • With side braids (3-strands, simple, lace or French):
  • With a stick:
                                             

  • With a pair of sticks:

  • With an alligator clip:


-For flipped-buns with volume at the front, see my fem!Tenth Doctor hairstyle:

-The half-flipped bun variation: Another flipped-bun variation with a stick: Instead of flipping all hair before inserting the fork o stick, here I flipped half of the hair and wrapped the rest around the stick:


SwordWomanRiona / rionashairblog.blogspot.com.es

If you copy-and-paste this post and/or alter it without any permission, credit or link, you're stealing my content. In that case, please stop. Please ask before using my work, or at least share it properly, giving credit to me and my blog.

Monday, 3 February 2014

Cosplay styles: Elven ranger hairstyle

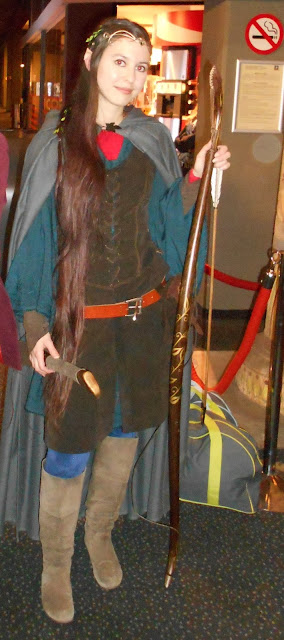
I went as a Rivendell Elven ranger for the opening of The Desolation of Smaug (2013) and this is how I wore my hair:


It inspired on Tauriel's hair, although I didn't have the time to do the 'authentic' Tauriel style. I'll be attempting that one one of these days. I'm still honing my fishtail and close to the head lace braids as yet, too :).

   This one is comparatively easier. It consists of a three-strand lace braid on each side of the head (not as high as Tauriel wears them) and a simple three-strand at the back of the head. I joined these three braids together at the back and tied them with a clear elastic. Then I did a rope braid.
   I wanted to wear my hair loose but not to have to worry about it tangling too much, so I imitated Tauriel  (she seems to do this to her hair in some of the promos) and contained my hair by braiding the ends a bit and tying them off with a clear elastic.

  I used a bit of aloe vera gel, which can be used as a fixing styling gel, to fix the braids a bit and help tame the flyaways. The final touch was a decorative German silver leaf barrette over the clear elastic that holds the three accent braids together.
 For the 2014 Battle of Five Armies premiere I wore a similar style, only with leaf ribbon in the side-braids and a circlet:
 
For lace-braids and rope braids, these can be handy:
 
-Three-strand lace-braid: Like a normal braid, only you add hair from one side as you braid (can be added from either of the two sides). In a French or Dutch braid you add hair from both sides as you braid:

                                             
-Rope braid: Can look tricky, but it's really simple. You simply divide the hair in two strands and twist them together. It's important to twist always in the same direction and keep twisting all the way until the braid is finished and tied (I'd skip the hairspray every time one does a braid or any style, though. Too much hairspray can dry out the hair. Aloe vera gel or a sea-salt based fixator is better for a lighter, alcohol-free hold).
 
SwordWomanRiona / rionashairblog.blogspot.com.es
Don't opy-and-paste this post and/or alter it without any permission, credit or link. Please ask before using my work, or at least share it properly, giving credit to me and my blog.